Monday, March 28, 2011

Beer + Arduino = Remote Entry

Well, all it took was three beers, a little bit of reading, and some testing to get my Nike+iPod set up as an iFob device for remote entry on my car.


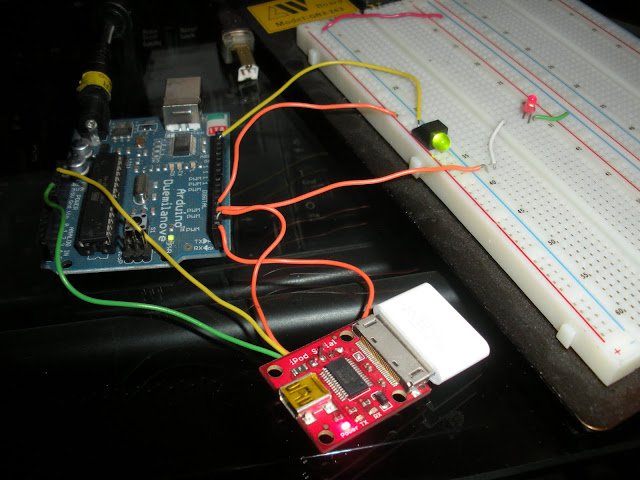
I followed the tutorial over at Sparkfun and purchased an Arduino Duemilanove, a Nike+iPod device, a Serial to USB adapter, and a soldering Iron. The first step was to solder jumpers to the four ports on the Nike. Then i fired up the included *.PDE from the Sparkfun tutorial, set the unique id for my footpad, and powered everything on.

At first it appeared that nothing was working. The status lights that lit up on the Serial to USB connected where no longer firing, and the LED pins where not doing anything special. I of course called my programming friend over at this time and we took a look at it. After a lot of beer and many hours, neither of us could figure out why the two devices weren't talking.

Well, the other day I came across another tutorial on interfacing a serial device to the Arduino and noticed that they mentioned an interesting fact. The TX of the device was supposed to be connected to the TX on the Arduino.

Well, now that I have reset everything that we worked on while debugging the device. Re-uploaded the original PDE, and connected LED's to the pins that are supposed to lock/unlock the doors. I gave it a try. And success. It was just a matter of connecting the device up correctly. Another thing to note is that the status lights on the Serial to USB device will not light up for communications on the Serial port, just on the USB port. So, don't do like I did and use those as a troubleshooting tool.


From arduino

A short Video of it working.
From arduino

Next step, install into car.


Intel Atom + 2Gb Ram + Touchscreen = Carputer


I finally did some work on the the Carputer setup this weekend. While I am not too happy about having to use Windows for my operating system, I am impressed with Centrafuse, the "front End" software that will be my interface in the car. At $80, the front end is reasonably priced, especially for all the features it includes. In addation to the stock features, you can download the SDK and start developing your own plugins and skins, customizing the look, feel, and overall function of the suite.


Current Hardware setup:

ASUS AT5NM10-I
Intel ATOM D510
2x 1Gb RAM PC2-6300
32Gb SATA SSD - Adata
Space Navigator
7" Touch Screen

Future Hardware:
GPS
Bluetooth
Soundcard
USB Hubs


Software setup:

Windows 7 Ultimate
Google Chrome
Centrafuse
PDANet for internet via Droid.


Centrafuse:


Centrafuse comes with built in support for many car/hands free operations. When it first launches, after a complete reboot, it takes a minute for it to load the plugins and of course there is that nice little warning prompt you have to get through. Once that is complete, about 5 seconds, your ready to start enjoying all the benefits it has to offer, Including...

GPS navigation
Audio playback with visualations,
Video playback
Web browsing.
Picture Browsing,
Graphic Equalizer
Weather
Pandora - (User generated plugin)

There are many more features, but I haven't had a chance to test all of them. Once I get the rest of the Hardware required, i'll post more information.

All in all, the system runs great, from pressing of power button to full boot, it takes 23 seconds. Standby takes 10 seconds to show screen and be usable but the music resumes playing after 1 second. Centrafuse was extremely responsive, with minor glitches on the visual effects here and there, not bad considering the graphics are embedded in the processor. The interface was more than touch friendly and looked great at 800/600. I toyed with the idea of running a higher resolution but realized at this point there is no need.

I hope to have everything in my car within a month. Of course this is also about the same time I expect to be pulling out the engine but that project should only take a few months. (keeps fingers crossed). Once I have some miles on the system i'll try to remember to post a complete write-up on the performance and usability of the system while driving. Next step will be to install a guardrail avoidance system. :-)

Thursday, March 10, 2011

Learning Permit acquired!

I have been devouring information from the forums every day, (Mainly http://www.ka-t.org) and reading about anything I could find for setting up a turbo. I have learned many interesting aspects that need to be measured and calculated for the setup I am attempting to build. Below is my current shopping list for the engine and some other aspects of the car I plan to work on. Please leave comments or suggestions. I am always open to ideas and learning.

[XXXXXXXX--]80% - Planning
[----------]0% - Fabrication


I plan to start posting as much information as I can find from the sites I've read. Mainly to securely store it all in one location as well as provide a source for others whom are interested in following the same route. I've noticed that there are a lot of people whom jump on the forums and start posting questions, I myself felt tempted to do the same. That is until I noticed that there was a bit of animosity towards noobs posting simple questions. It wasn't that the question was easy or hard to answer, the frustration from most of the veteran'd users was that the information was already posted somewhere, nested in a thread, and if the new user had done a little bit of searching, they would have been able to answer their own question. I have sat down and read thread after thread on the same subject, spending hours to answer simple basic questions. Thankfully i was able to dedicate the time and enjoy spending time in front of the computer. But for those who would rather grab an answer and head on their way, I hope this blog can assist with that. Also I find a lot of sites that reference photos in their "How to's" but when the page loads, the photos are missing. I hope to be able to repost those photos so we don't loose them to an old, abandoned post.